Grill Perfect Juicy Burgers Every Time: Expert Tips for Success
There's an undeniable magic to a perfectly grilled burger. That smoky aroma, the crispy, charred exterior giving way to an incredibly juicy, tender interior – it's a culinary experience that epitomizes summer. Yet, for something so seemingly simple, achieving that consistently perfect burger can often feel like a elusive goal. Many of us have faced the disappointment of a dry, flavorless patty, or one that’s stubbornly refused to cook evenly. But what if we told you that mastering the art of
how to grill burgers is not only achievable but also surprisingly straightforward with the right knowledge and techniques?
This comprehensive guide will walk you through every essential step, from selecting the best ground beef to perfecting your grilling method, ensuring you create a fantastic burger every time. Say goodbye to sad, dry patties and hello to a symphony of flavor and juiciness that will make you the undisputed grill master.
The Foundation: Essential Ingredients and Tools for Success
Before you even think about firing up the grill, preparing properly is key. Having the right ingredients and tools on hand sets the stage for success and makes the entire process smoother and more enjoyable.
Choosing the Right Beef for Ultimate Juiciness
The quality and fat content of your ground beef are arguably the most critical factors in achieving a juicy burger. While lean beef might be tempting for health reasons, for burgers, fat equals flavor and moisture.
We strongly recommend using
80% lean ground beef, also known as 80/20. This means the meat contains 80% lean muscle and 20% fat. This ratio is ideal because:
- Moisture Retention: The fat melts during cooking, basting the meat from within and preventing it from drying out.
- Flavor Enhancement: Fat carries and enhances the savory flavors of the beef, making for a richer taste.
- Texture: It contributes to a tender, succulent texture that's difficult to achieve with leaner cuts.
Avoid anything leaner than 80/20 for your burgers. Save the leaner options for meatballs or casseroles where moisture isn't as dependent on internal fat. For more insights on selecting and preparing your patties, check out our guide on
Unlock Juicy Burgers: The Right Beef, Patty Prep, and Grill Tools.
Must-Have Grilling Equipment
A few key pieces of equipment will elevate your burger grilling game:
- Quality Charcoal Briquets: For that authentic smoky flavor, charcoal is hard to beat. Look for a reliable brand like Kingsford™ Original Charcoal Briquets, known for their consistent heat and burn time.
- Digital Meat Thermometer: This is your secret weapon for perfectly cooked burgers and food safety. Guessing doneness is a recipe for disappointment (or worse). A thermometer ensures your burgers reach the ideal internal temperature without overcooking.
- Long-Handled Metal Spatula: A sturdy spatula is essential for handling patties gently and flipping them confidently. Avoid plastic spatulas that can melt or flex under heat.
- Grill Brush: Clean grates prevent sticking and ensure beautiful grill marks. A wire brush is crucial for pre-grill cleaning.
- Charcoal Chimney Starter: While not strictly necessary, a chimney starter makes lighting charcoal quick, easy, and free of lighter fluid taste.
Crafting the Perfect Patty: Secrets to Shape and Flavor
The way you prepare your patties significantly impacts their final texture and evenness of cooking. This stage is crucial for preventing those dreaded "burger pucks."
Seasoning and Forming Your Patties
Gentle handling is the mantra here. Overworking the meat can lead to tough burgers, as it compacts the protein fibers.
- Season Liberally: Before forming, gently mix in salt and freshly ground black pepper. Don't be shy; burgers need a good amount of seasoning to truly shine. Avoid adding too many other ingredients that can dilute the beef flavor or affect patty integrity.
- Form Gently: Divide your ground beef into 6-ounce portions. This size is typically between a baseball and a softball. With light hands, gently flatten each portion into a patty about ¾” thick. The goal is to keep the meat loosely packed.
- The "Thumbprint" Indentation: This is a game-changer! Press a slight indentation into the center of each patty with your thumb or the back of a spoon. As burgers cook, the center tends to swell. This indentation helps the patty maintain a flatter, more even shape, preventing it from becoming too round or domed.
- Refrigerate: Once formed, refrigerate your patties for at least 30 minutes, or until you're ready to grill. Chilling helps them hold their shape better on the hot grill.
Remember, minimal handling ensures a tender burger. For more expert tips on patty preparation and tool selection, revisit our article on
Unlock Juicy Burgers: The Right Beef, Patty Prep, and Grill Tools.
Mastering the Flames: Building Your Charcoal Grill for Optimal Results
The key to perfectly grilled food, especially burgers, lies in understanding and controlling your heat. For charcoal grilling, this means mastering the two-zone method.
Prepping Your Grill and Building the Fire
- Clean Your Grates: Before adding any charcoal, give your top grill grate a thorough brushing. A clean grate prevents sticking and ensures those beautiful sear marks.
- Light Your Charcoal: Pour your charcoal briquets into a chimney starter and light them, or pile them into a mound and light them directly in the grill. Be patient; wait until the charcoal is fully lit and covered in a layer of gray ash. This indicates they are ready for cooking and will provide consistent heat.
- Implement the Two-Zone Method: Once the coals are ash-gray, arrange them on one side of your grill, leaving the other side empty. This creates a "direct heat zone" (over the coals) and an "indirect heat zone" (the void). This setup is invaluable for grilling burgers as it allows you to sear rapidly and then finish cooking gently without burning.
- Preheat the Grate: Add the grate back to the grill and let it heat up for 5-10 minutes. This ensures the grate itself is hot enough for a good sear.
- Achieve Medium Heat: For burgers, aim for medium heat, which is around 400°F. You can control the heat by adjusting the bottom vents on your charcoal grill – opening them fully increases airflow and heat, while closing them reduces it. For more detailed tips on managing your charcoal grill's temperature and avoiding common pitfalls, see Master Charcoal Grilling: Avoid Dry Burgers with These Techniques.
Gauging Grill Heat Without a Thermometer (An Old-School Tip)
While a grill thermometer is highly recommended, if you're in a pinch, you can estimate heat by holding your hand 5 inches above the grate:
- High Heat (450-550°F): You can hold your hand there for 2-3 seconds.
- Medium Heat (350-450°F): You can hold your hand there for 4-5 seconds. (This is what we want for burgers)
- Low Heat (250-350°F): You can hold your hand there for 6-7 seconds.
The Art of Grilling: Timing, Flipping, and Achieving Peak Juiciness
This is where the magic happens! Proper technique during cooking ensures a beautiful crust, locked-in juices, and perfect doneness.
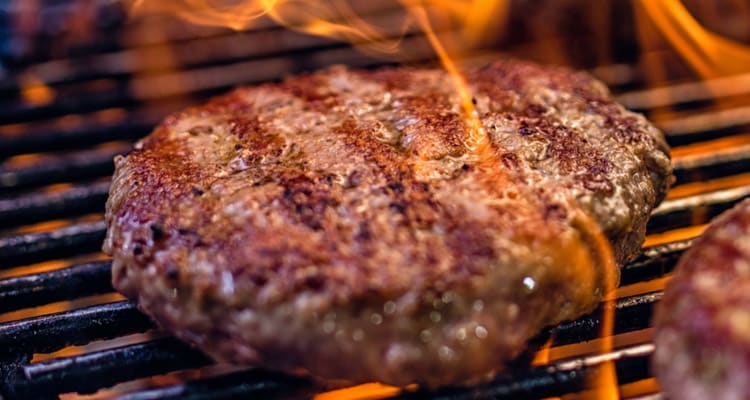
Searing for that Perfect Crust
- Place Over Direct Heat: Carefully place your chilled patties directly over the hot coals. You should hear a satisfying sizzle.
- Sear for 4-5 Minutes: Allow the burgers to sear undisturbed for 4 to 5 minutes. This direct heat creates a delicious, brown, and crispy crust on the bottom – a process known as the Maillard reaction, which develops rich flavors.
- Handle Gently, Don't Press: Resist the urge to press down on the burgers with your spatula. This unforgivable sin squeezes out precious juices and fat, leading to a dry burger. Handle them gently and let the grill do its work.
- Manage Flare-Ups: Flare-ups are a natural part of grilling, especially with fatty burgers. If they occur, simply move the burgers to the indirect heat zone until the flames subside, then return them to sear. You can also briefly close the lid to starve the flames of oxygen.
The Single Flip Rule and Finishing Strong
- When to Flip: You'll know it's time to flip when you see liquid pooling on the uncooked surface of the burgers. This indicates that the heat has sufficiently penetrated the bottom half.
- Flip Only Once: Using your long-handled metal spatula, flip each burger only once. Flipping multiple times disrupts the cooking process and can prevent a good crust from forming. Sear the second side for another 4-5 minutes to lock in juices.
- Finish with Indirect Heat: After both sides are seared, reposition the burgers to the indirect heat zone (the side without coals). Cover the grill with the lid. This allows the burgers to cook through gently without charring the exterior, ensuring even doneness and juiciness.
- Check for Doneness: This is where your digital meat thermometer becomes indispensable. Insert it into the side of the thickest part of the burger. Cook until the desired internal temperature is reached. For a safe and universally recommended minimum doneness for ground beef, aim for 160°F (71°C). For those who prefer different levels:
- Medium-Rare: 130-135°F (54-57°C)
- Medium: 135-140°F (57-60°C)
- Medium-Well: 140-150°F (60-66°C)
- Well-Done: 155-160°F (68-71°C)
Remember, cooking ground beef to at least 160°F is recommended for food safety. For more techniques to ensure your burgers are juicy and perfectly cooked, consult Master Charcoal Grilling: Avoid Dry Burgers with These Techniques.
The Grand Finale: Assembling Your Masterpiece
Once your burgers hit their ideal internal temperature, they're ready to be enjoyed!
Toasting Buns and Topping Your Burger
There's no need to rest burgers like you would a steak. Once they're done, they're ready to serve!
For an extra touch, lightly toast your burger buns on the grill (over indirect heat or for a quick moment over direct heat) for added texture and flavor. Then, simply place your perfectly grilled, juicy burgers on their toasted buns and add your favorite toppings. Whether you prefer classic cheese, fresh lettuce and tomato, crispy bacon, or a gourmet spread, the canvas is yours.
Conclusion
Grilling perfect, juicy burgers every time is a skill that comes with practice and a solid understanding of fundamental techniques. By choosing the right beef, gently forming your patties with the thumbprint trick, building a smart two-zone fire, and mastering the sear-then-finish method with the help of a digital meat thermometer, you'll consistently achieve restaurant-quality results in your own backyard. So, gather your ingredients, fire up that grill, and get ready to impress your friends and family with burgers that are truly a cut above the rest. Enjoy the process, savor the flavors, and become the master of the flame!